How to optimize the queries:
Order of the cost of the operators (Operators at the top will produce results faster than those listed at the bottom)
= >, >=, <, <= LIKE<>
• Out of these two queries, the second one will run much faster than the first if the column column_name has index on it.
SELECT column_name
FROM table_name
WHERE LOWER (column_name) = 'name'
SELECT column_name
FROM table_name
WHERE column_name = 'NAME' or column_name = 'name'
• In where condition,
WHERE SUBSTRING (firstname, 1, 1) = 'm'
WHERE firstname like 'm%'
Both of these WHERE clauses produce the same result, but the first one is non-sargable (it uses a function) and will run slow, while the second one is sargable, and will run much faster.
• In the following statements, they are in the order decreasing the cost.
Avoid using “NOT IN” Clause because, SQL Server optimizer has to use a nested table scan to perform this activity
Use EXISTS or NOT EXISTS.
Use IN.
Perform a LEFT OUTER JOIN and check for a NULL condition.
• When you need to use the LIKE Operator,
Use LIKE 'm%'
Than LIKE '%m'
If the leading character in a LIKE clause is a wildcard, the Query Optimizer will not be able to use an index, and a table scan must be run, reducing performance and taking more time.
The more leading characters you can use in the LIKE clause, the more likely the Query Optimizer will find and use a suitable index
• When you have a choice of using the IN or the BETWEEN clauses in your Transact-SQL, you will generally want to use the BETWEEN clause, as it is much more efficient. For example:
SELECT customer_number, customer_name
FROM customer
WHERE customer_number in (1000, 1001, 1002, 1003, 1004)
Is much less efficient than this:
SELECT customer_number, customer_name
FROM customer
WHERE customer_number BETWEEN 1000 and 1004
• Where possible, avoid string concatenation in SQL code, as it is not a fast process, contributing to overall slower performance of your application
• If you have a WHERE clause that includes expressions connected by two or more AND operators,
SQL Server will evaluate them from left to right in the order they are written.
This assumes that no parenthesis have been used to change the order of execution.
Because of this, you may want to consider one of the following when using AND:
•Locate the least likely true AND expression first. This way, if the AND expression is false, the clause will end immediately, saving time.
•If both parts of an AND expression are equally likely being false, put the least complex AND expression first. This way, if it is false, less work will have to be done to evaluate the expression.
• SELECT employeeID, firstname, lastname
FROM names
WHERE dept = 'prod' or city = 'Orlando' or division = 'food'
If we have index on dept, but not on city and division, this index will not be useful in this query.
So, instead of using the above query we can use the following query.
SELECT employeeID, firstname, lastname
FROM names
WHERE dept = 'prod'
UNION ALL
SELECT employeeID, firstname, lastname
FROM names
WHERE city = 'Orlando'
UNION ALL
SELECT employeeID, firstname, lastname
FROM names
WHERE division = 'food'
• If your SELECT statement contains a HAVING clause, write your query so that the WHERE clause does most of the work (removing undesired rows) instead of the HAVING clause do the work of removing undesired rows.
• If we are joining some tables, always use the table which is having much data at the top and the table which is having less data at the bottom. And also, use the hard coded values at the bottom. Because, the execution starts from the bottom to top it should filter out all the hard coded values and Joins at the bottom itself which does not allow searching the Heavy table to FULL ACCESS.
• Virtual Indexes: Using virtual indexes we can decrease time of the execution of the query.
Syntax:
If the table has full access (We can check Table access in Explain plan) then we can create the virtual index on these table aliases. Say table_1 and table_2 are the two tables which have full access. Create the VI on these 2 like in the following way.
Select /* + INDEX (table_alias_1) INDEX (table_alias_2) */From ….Where ….
But it increases the cost to execute the query…which is a big disadvantage because if we use the query in reports or any other tools or in packages then it will take more time because in all the above cases cost is crucial.
The advantage of using virtual indexes is that we can see the output of the query quickly.
Wednesday, August 27, 2008
Flow of Order Management
Begin by placing the order in Order Management (OM):
• Entered (OM): Order is saved but not booked.
• Booked (OM): Order is booked.
• Scheduled (OM): You can customize the workflow to show the Scheduled statuswhich indicates that the order line has been successfully scheduled by adding acustomized activity after the Schedule activity. This activity will make a process Shipping
14-31order API call to update the status to Scheduled. When the ship line logic starts, theorder line status changes to Awaiting Shipping.
• Awaiting Shipping (OM): Order is booked and scheduled but lines have not beenpicked. This status is also displayed after the line has been ship confirmed but beforethe Order Management interface has been run.
• Picked (OM): Order is booked and lines are picked.
• Open (OM): This status of a delivery on the Additional Line Information formindicates that none of the delivery lines associated with that delivery have beenship confirmed.Navigating to Shipping Execution, the delivery line status flow is:
• Ready to Release (SE): Order line is booked and passed to Shipping Execution. Itis now a delivery line that is eligible for Pick Release.
• Not Ready to Release (SE): A delivery line might be in this status when it is interfacedmanually into Shipping Execution, is not scheduled, and has no reservations. Whenlines are imported automatically from Order Management this status is not used.
• Backordered (SE): The delivery line is pick released but no allocations were createdor partial allocations occurred. As an example, if a delivery line has a quantity of100, and at pick release only 25 are available for allocation, the original delivery linesplits to create a new line (quantity of 75) for the unallocated portion with a status ofBackordered. The quantity on the original delivery line changes to 25 to reflect theallocated portion with a status of Staged/Pick Confirmed.
• Staged/Pick Confirmed (SE): The delivery line is successfully pick released. It occursafter pick confirm to indicate subinventory transfer from source location to staginglocation is complete. Lines remain staged until they are ship confirmed.
• Released to Warehouse (SE): Pick Release has started but not completed. Either noallocations were created or allocations have not been Pick Confirmed.Note: Both Backordered and Staged/Pick Confirmed statusesprovide the ability to perform opportunistic cross-docking forwarehouse organizations with Oracle Warehouse Management(WMS) installed.
• Shipped (SE): This line status indicates that the delivery associated with the deliverylines is ship confirmed.
• Interfaced (SE): If delivery was sourced from Oracle OM: The delivery line isshipped and the OM Interface and Inventory Interface concurrent processeshave completed. If delivery was sourced from an Oracle Application other thanOM: The delivery line is shipped and the Inventory Interface concurrent processhas completed.
• Canceled (SE): This status indicates that the delivery line was cancelled.Navigate back to Order Management and query the order which results in OM pullingupdated Pick Release information from Shipping Execution:
• Picked (OM): Pick release has completed normally (both allocation and pickconfirm). The delivery associated with the delivery line(s) may have also been ShipConfirmed but the Delivery may not be set in transit and the Trip may not be closed.14-32 Oracle Order Management Implementation Manual
• Picked Partial (OM): This status occurs when a delivery line is not allocated the fullquantity during Pick Release and Ship Confirm has not occurred.The delivery line splits during Ship Confirm and the information passes toOrder Management through the Process Order API. The order line splits toreflect the changes that occurred during the Shipping process. As an example, acustomer orders quantity 50. There are 20 on hand in inventory. The delivery linesplits into two delivery lines and therefore represents two order lines in OrderManagement. The order line with quantity 20 has the status of Picked or Shippeddepending on whether or not the delivery line is Ship Confirmed, the Delivery set intransit, and the Trip closed. The second order line with a quantity of 30 has statusof Awaiting Shipping.Shipping Execution passes the status information to Order Management when ShipConfirm is complete:
• Shipped (OM): The delivery associated with the line is Ship Confirmed. TheDelivery status is set to In transit. This status appears at the line level as well as inthe Additional Line Information at the Pick Status field.
• Awaiting Shipping (OM): Awaiting information from shipping. This status willremain until the Order Management interface is run.
• Awaiting Fulfillment (OM): Not all shippable lines in a fulfillment set or aconfiguration are fulfilled. The current line is waiting for other lines in the fulfillmentset or the configuration to be fulfilled. This is a synchronization step within theworkflow process.
• Fulfilled (OM): All lines in a fulfillment set are fulfilled.Fulfillment Sets are defined as a group of order lines that are fulfilled together. Itemsthat are not shippable can be in fulfillment sets with shippable items, and then willnot be fulfilled (and therefore invoiced) until the shippable items are fulfilled. A linecan belong to either a ship set or an arrival set, but can belong to multiple fulfillmentsets.
• Interfaced to Receivables (OM): Order Management has written information tothe Receivables Interface tables. You should run Auto Invoice (from Receivables)to generate the Invoice.
• Partially Interfaced to Receivables (OM): This status is used in a PTO flow andindicates that the particular PTO item is required for revenue.
• Closed (OM): Closed indicates that the line is closed. It does not necessarily indicatethat the line is interfaced to Accounts Receivable (AR) since you must close lineactivity in a no-bill flow.
• Canceled (OM): Indicates that the line is completely canceled. No further processing will occur for this line.
XML Sql Calls Concept
The XML Publisher data engine enables you to rapidly generate any kind of XML data structure against the Oracle database in a scalable, efficient manner. The data template is the method by which you communicate your request for data to the data engine. It is an XML document whose elements collectively define how the data engine will process the template to generate the XML.
Process of Overview of Implementing a Data Template for Use with the Concurrent Manager
The process overview for implementing a data template to be called by the Concurrent Manager is as follows
Using an XML or text editor:
• Write the data template XML document following the guidelines in this post.
Using the Template Manager:
• Create a Data Definition for the data template in the Template Manager. You will upload your data template to the Template Manager.
• Register any layout templates that you wish to apply to the data generated from your data template.
Using Oracle Applications System Administrator responsibility:
• Register the data template as a Concurrent Program in Oracle Applications noting the following:
• Designate "XDODTEXE" as the executable for your concurrent program. This is the XML Publisher Java concurrent program that will execute your data template.
• The Short Name that you assign to the program must match the Data Definition Code that you assigned to the data template in the Template Manager.
The XML Publisher executable uses the short name of the program to locate the corresponding data template in the Template Manager.
• Assign the concurrent program to an appropriate Request Group for your users to run.
When your user submits the request, the Concurrent Manager executes the XML Publisher Data Template Java concurrent program. The short name of the concurrent program is used to locate the appropriate data template in the Template Manager. When the data generation is complete, the Concurrent Manager’s Output Post Processor applies the layout template to the generated XML.
The Data Template Denition
The data template is an XML document that consists of four basic sections:
define parameters,
define triggers,
define data query,
define data structure.
This structure is shown in the following graphic:
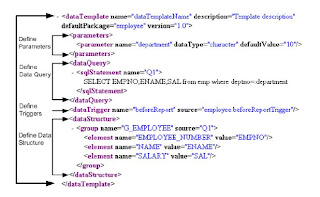 As shown in the sample figure, the data template consists of a
 section
in which parameters are declared in childelements; a
section in which the SQL queries are defined in childelements; and a
section in which the output XML structure is defined.
Data Query Section
Thesection of the data template is required.
How to Dene Queries
Theelement is placed between the open and close dataQuery
tags. Theelement has a related attribute, name. It is expressed
within thetag. The query is entered in the CDATA section. For example:
How to Call a Data Template
There are two methods for calling the data engine to process your data template:
• Concurrent Manager
• Data Engine Java APIs
Before you can use either of these methods, you must first register your data template
in the Template Manager as a Data Definition.
Assigning a Default Template
You can assign a default template to the concurrent program that will be used by the
concurrent manager and XML Publisher to publish the report unless the user selects
a different template at runtime.
To assign a default template to a concurrent program:
1. Navigate to the Update Concurrent Program window (available from the System
Administration Responsibility).
Process of Overview of Implementing a Data Template for Use with the Concurrent Manager
The process overview for implementing a data template to be called by the Concurrent Manager is as follows
Using an XML or text editor:
• Write the data template XML document following the guidelines in this post.
Using the Template Manager:
• Create a Data Definition for the data template in the Template Manager. You will upload your data template to the Template Manager.
• Register any layout templates that you wish to apply to the data generated from your data template.
Using Oracle Applications System Administrator responsibility:
• Register the data template as a Concurrent Program in Oracle Applications noting the following:
• Designate "XDODTEXE" as the executable for your concurrent program. This is the XML Publisher Java concurrent program that will execute your data template.
• The Short Name that you assign to the program must match the Data Definition Code that you assigned to the data template in the Template Manager.
The XML Publisher executable uses the short name of the program to locate the corresponding data template in the Template Manager.
• Assign the concurrent program to an appropriate Request Group for your users to run.
When your user submits the request, the Concurrent Manager executes the XML Publisher Data Template Java concurrent program. The short name of the concurrent program is used to locate the appropriate data template in the Template Manager. When the data generation is complete, the Concurrent Manager’s Output Post Processor applies the layout template to the generated XML.
The Data Template Denition
The data template is an XML document that consists of four basic sections:
define parameters,
define triggers,
define data query,
define data structure.
This structure is shown in the following graphic:
 As shown in the sample figure, the data template consists of a
 in which parameters are declared in child
section in which the SQL queries are defined in child
Data Query Section
The
How to Dene Queries
The
tags. The
within the
How to Call a Data Template
There are two methods for calling the data engine to process your data template:
• Concurrent Manager
• Data Engine Java APIs
Before you can use either of these methods, you must first register your data template
in the Template Manager as a Data Definition.
Assigning a Default Template
You can assign a default template to the concurrent program that will be used by the
concurrent manager and XML Publisher to publish the report unless the user selects
a different template at runtime.
To assign a default template to a concurrent program:
1. Navigate to the Update Concurrent Program window (available from the System
Administration Responsibility).
How to delete stock locators by using API
How to delete stock locators by using API
1. Locators If user wants to delete some inactive locators but in oracle application delete button is disabled on locators interface.
2. Create TableCreate a new table by using following script with all locator segments
CREATE TABLE DEV_DATA
( SR_NO NUMBER,
INV_ORG_ID NUMBER,
INVENTORY_ORGANIZATION NUMBER,
SUB_INVENTORY CHAR(3 BYTE),
WAREHOUSE CHAR(3 BYTE),
FLOR CHAR(3 BYTE),
ROWN CHAR(3 BYTE),
RACK CHAR(3 BYTE),
BIN CHAR(3 BYTE),
BOX CHAR(3 BYTE),
SUPPLIER CHAR(4 BYTE),
SPARE1 CHAR(3 BYTE),
SPARE2 CHAR(3 BYTE),
CODE CHAR(45 BYTE),
CREATION_DATE DATE,
STATUS CHAR(1 BYTE)
)
3. Upload Data in Table by Using SQLLDR
Control File Syntax
LOAD DATA
INFILE ‘Data.csv’
APPEND INTO TABLE Dev_Data
REPLACE FIELDS TERMINATED BY ‘,’
TRAILING NULLCOLS
(SR_NO “trim(:SR_NO)”,
INV_ORG_ID “trim(:INV_ORG_ID)”,
INVENTORY_ORGANIZATION “trim(:INVENTORY_ORGANIZATION)”,
SUB_INVENTORY “trim(:SUB_INVENTORY)”,
WAREHOUSE “trim(:WAREHOUSE)”,
FLOR “trim(:FLOR)”,
ROWN “trim(:ROWN)”,
RACK “trim(:RACK)”,
BIN “trim(:BIN)”,BOX “trim(:BOX)”,
SUPPLIER “trim(:SUPPLIER)”,
SPARE1 “trim(:SPARE1)”,
SPARE2 “trim(:SPARE2)”,
CODE “trim(:CODE)”,
CREATION_DATE “trim(:CREATION_DATE)”
)
Verify Data is uploaded successfully by using following two queries
Select count(*) from dev_data
Select * from dev_data
4. Inactive Locator By Passing Inactive date
5. Deleting Script (API)
Connect by Using APPS Credentials to Database
Run the following scripts this will delete locator
DECLARE
l_msg_data VARCHAR2 (100);
l_msg_count NUMBER;
l_return_status VARCHAR2 (1);
l_locator_id NUMBER;
l_locator_exists VARCHAR2 (1);
l_org_id NUMBER := 116; /*Organization_id */
l_organization_code VARCHAR2 (10) := ‘U11′; /*Organization_Code */
l_sub_code VARCHAR2 (10); /*Variable for Subinventory*/
l_concatenated_segments VARCHAR2 (100); /*Variable for Locator Segment*/
l_user_id NUMBER := 1262; /* User ID From FND_users Table */
l_resp_id NUMBER := 20634; /*Responsibility Id*/
l_resp_appl_id NUMBER := 401;
/* Responsibility Application id */ /*Fetch data into cursor for deletion of Locator*/
CURSOR c_loc IS
SELECT inventory_location_id, organization_id, description, subinventory_code sub_inventory, code
FROM apps.dev_data;
v_loc c_loc%ROWTYPE;
BEGIN
/* APPS_INITIALIZE required because indirectly use profile options */
fnd_global.apps_initialize (l_user_id, l_resp_id, l_resp_appl_id);
–Open Cursor
OPEN c_loc;
LOOP
FETCH c_loc
INTO v_loc;
EXIT WHEN c_loc%NOTFOUND;
l_concatenated_segments := v_loc.code;
l_sub_code := v_loc.sub_inventory;
l_locator_id := v_loc.inventory_location_id;
fnd_msg_pub.initialize;
DBMS_OUTPUT.put_line ( ‘Trying to Delete ‘
l_concatenated_segments
‘-’
l_locator_id
);
inv_loc_wms_pub.delete_locator (x_return_status => l_return_status,
x_msg_count => l_msg_count,
x_msg_data => l_msg_data,
p_inventory_location_id => l_locator_id,
p_organization_id => l_org_id,
p_organization_code => ‘U11′,
p_concatenated_segments => l_concatenated_segments,
p_validation_req_flag => ‘N’
);
COMMIT;
DBMS_OUTPUT.put_line (’Return Status ‘ l_return_status);
IF l_return_status IN (’E', ‘U’)
THEN DBMS_OUTPUT.put_line (’# of Errors ‘ l_msg_count);
IF l_msg_count = 1
THEN DBMS_OUTPUT.put_line (’Error ‘ l_msg_data);
ELSE
FOR i IN 1 .. l_msg_count
LOOP
DBMS_OUTPUT.put_line (’Error ‘ fnd_msg_pub.get (i, ‘F’));
END LOOP;
END IF;
ELSE
DBMS_OUTPUT.put_line (’Locator Id is ‘ l_locator_id);
END IF;
END LOOP;
CLOSE c_loc;
END;
6. Check values
Subscribe to:
Posts (Atom)